It has been forever. UGH. My apologies.
Lately I have had so many emails and messages and even a few phone calls from you awesome people who tell me that you are waiting for me to post more booth stuff.
Good news. I have new booth stuff for you.
It's actually from August 2014 NY NOW. Pretty new.
This is the Eleven Point Home Fragrance booth. It was on Pier 94 and the newest brand introduction of my awesome client Scentations Home Fragrance. I love love love working with this company, and am so proud of what we created for Eleven Point. I will post more about the line separately, but let's get to what you are asking for, the booth stuff.
This was a 10"x10" corner booth. As with most of us, they didn't want to spend a gazillion dollars on a booth but, they still wanted a presence. The goal was to create a little wholesale shop where buyers could see the line, quickly understand the line, experience the fragrances and place orders.
The NY NOW show is offering some new options for walls these days, so there was no need for foam board this time. We decided to order the MDF panel option and have them paint it for us, you just need to supply them with the Behr paint color (I chose a charcoal grey). We needed 2 ten foot walls done (since we had a corner). On the Piers we did this through FB International (via the show). The pricing was somewhere around $150 per panel (painted) and we needed 6 panels (they cut them and price them to just a little over 3' each since most of the booths are sold in 10' increments, if you go to Lowe's or Home Depot, they will be 4'x8' and you will pay around $25/panel unpainted), the unpainted was $120/panel. Not cheap. I know.
If you are local, the process they used to make the walls was super simple (explained below) and it could be easily done for WAY cheaper, but, if you are not local, it could be a pain to get this done on your own as the panels are not easy to transport and move around, they aren't heavy, this particular MDF was only 3/8" thick, these panels are floppy and cumbersome and 8 ft long.
If you decide to build a booth like this yourself, I would definitely go for the heavier MDF so that screwing into it wouldn't be an issue if you wanted to hang shelves or anything heavy-ish and remember to get the panels cut to your booth size so they fit your walls, or, you can always take 3 panels per wall and place your middle panel over the 2 others and the empty space, so that there wouldn't be cutting involved (and it looks pretty cool too).
I talked about this method with foam board here
Let's get to it...introducing the August 2014 Eleven Point booth
Here's what I did.
As mentioned the walls were ready to go - well, almost, when I got to the booth they were still being painted, but, it was done quickly. In a nutshell, this is what FB International did for the walls - they screwed in 2 little silver squared inverted U brackets at the top of each of the panels and simply hung them over the squared bars of the booth structure. (This is new too, remember how the booths were all loose drape over round poles? square now.)
No, they were not super strong and yes, a few of the brackets fell off and I had to have FB come and put them back in. MDF is not the greatest stuff to screw into, often screws don't catch and slip right out, this is what was happening, but it was fixable.
I had ordered a strip of wallpaper that was the same pattern I had designed in the line's packaging to personalize the space - I worked with Murals Your Way for this and used this same idea in all of our summer showrooms. It was easy and quick to install and is actually removable, so it can be used for a few shows if you need. Since my wall paint was pretty fresh, the vinyl didn't stick as securely as I would have liked, so I just added a few staples to make sure it was not going to unpeel.
For the booth sign, I had our graphics printed at Fedex Kinkos and I spray painted an old textured frame gold.
The wall sconces were a fun addition, they are battery operated, and don't shed much light, but they added a nice touch to the booth and didn't require wiring to install, only a plastic pushpin.
I bought several sets (again for all of our showrooms) on ebay. This particular set I sprayed gold quickly, to match the frame and the other booth details (they were originally a bronze color).
The frames on the wall were super lightweight black plastic Ikea frames (with plexi fronts rather than glass) and each one had a fragrance description from the Eleven Point line that I laid out and, again, printed at Kinkos. I had originally wanted to place 6 frames on one wall and 3 on the other, but that didn't happen, so I did a quick adjustment and put all 9 on the same wall.
Since the frames were so light, I used heavy duty velcro tape to stick them to the walls, MUCH faster and more forgiving than nails and hooks.
The cute linen grey bench was a score at TJ Max.
The table is from World Market, a gorgeous extendable table that we will be using for a while and was surprisingly easy to assemble (sign up for their emails and you will get great coupons and free shipping vouchers).
The carpet is from the wonderful Flokati Phil. I have had one of his Flokati rugs in our loft for many years and love it, so I called him to help me find the right one for the Eleven Point Booth. Once I was in the booth, I realized that an oval shape was the way to go, so all I did was tuck the corners under and it became this awesome puffy oval soft addition to the booth.
For the shelf under the Eleven Point sign, I used light metal brackets from Ikea and sprayed them gold, and a piece of wood that I had cut to the length I wanted at Home Depot. I added a coat of wood stain to it to bring it to the color of the other woods in the booth. I stained the extra piece they had cut off for me, and used it as a riser in the middle of the table to add a second layer to the main display.
Since the MDF walls were not very sturdy, I used my foam board trick and placed 2 pieces of scrap wood behind the shelf brackets to screw into - this added a lot of strength to the shelf.
(I would NOT have done a wall of shelves on these walls without doing some serious securing first, and even then, these thin MDF walls are not built for lots of shelving, I wouldn't risk it).
Here are some photos of the process, and the finished booth.
Showing posts with label merchandising. Show all posts
Monday, December 22, 2014
Tuesday, August 31, 2010
still more great booths!
My booth piece continues with more of my favorites in the simple, clean, lower budget-but-fabulous category from the August 2010 New York Gift Fair, here they are:
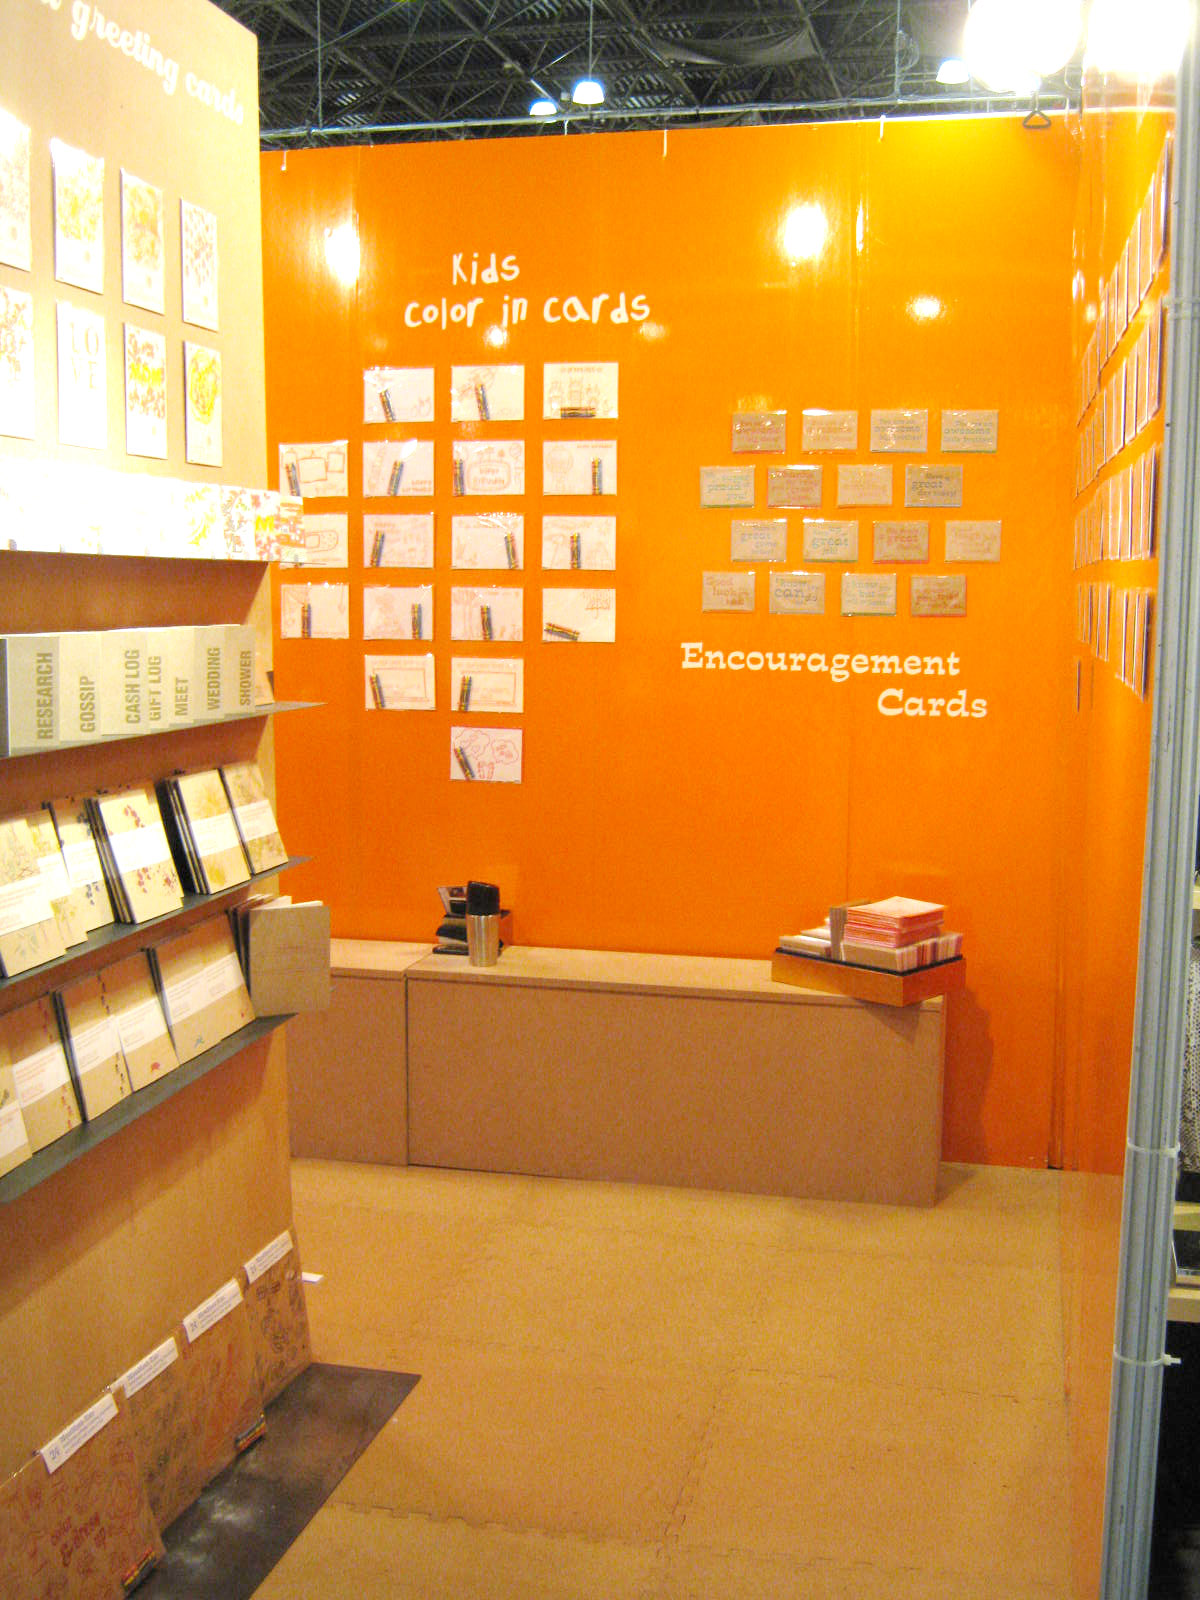
http://www.9spotmonk.com/ did a GREAT booth! foamcore white walls, covered in a fabulous high gloss orange vinyl adhesive. They also built a wall right in the middle of their booth which not only added 2 extra walls for displaying but also added architecture to the square booth. They used a craft paper brown to offset the high gloss orange to make their wall, for their bench at the back of the booth and for their floor.
LOVE this booth!
(and hope to have a link to share with you soon on where they got their orange high gloss vinyl!
http://www.flipandtumble.com/ took white and clean to new heights!
They did a floor that looks like wood, simple white furnishings (Ikea) and white walls.They lined their white walls with their fantastic bags, making the colors simply POP!
I think the simplicity of this booth and the almost laboratory look of it was a really smart way to showcase their products, let me tell you, walking down their aisle, you HAD to look in their booth, and that, as the fabulous martha would say, is a good thing!Lastly in this series, one of my favorite little booths at the show, http://www.baileydoesntbark.com/ .
Everytime I walked past this booth, I would admire and swoon a little...
Using simple dark stained wooden shelves and tables with non color, natural textured extras and vintagy details they acheived a beautiful soft look yet with a very sophisticated feel, right down to their beautiful sign! (the font is amazing!).
Through their display, they did a great job showing their clients how easy and impactful it could be to show their products once clients order them and have them in store.
They are showing retailers that their products look great grouped (hey retailers, buy a bunch of our stuff and you too can have this look!) Hello? who wouldn't want this look!?
So smart! So effective...YAYE Bailey Doesn't Bark!
(for some crazy reason I didn't ask...but I hope Bailey is a cat or a fish...or a pet rock...)
Labels:
architectural element,
booth decor,
booth design,
buyers,
decor,
display,
floor,
foamboard,
inexpensive,
merchandising,
NY Gift Fair,
sign,
trade show,
walls
Tuesday, July 20, 2010
shelves?
By now, you have probably noticed that some of the photos of my booth feature shelves on the foam board walls...These amazing shelves were the perfect size and weight for trade shows and were available at Ikea for years, to make matters even better (at the time), they ran about $3 per shelf, can you believe it? They called it the STRIPPA shelf (trust me, it is taking every ounce of restraint I can muster to not comment on the name).
Back to the perfect $3 shelf. Kind of too good to be true!...Yes, yes it was! Ikea does not make them anymore. (Waaaaa WAAAA, can you hear that disappointment music?...) I will post a bunch of close up photos of them however, when I am reunited with them in August at the show, if you know a carpenter or woodworker, you might be able to have some made, the construction is crazy easy.
If you want to use another type of small shelf, you can, and hanging them might sound like a process, but in actual fact, it is not that horrible to do, it just takes a little patience, some measuring and some organizing.
Here it goes.
Basically, what you are going to do, is sandwich your foam board between a strip of wood and a shelf,
that is how the shelf will stay up.
In the case of the STRIPPA shelves, there were simply 2 holes supplied, right in the shelves to hang them up.
A screw in each and presto, the shelf was up.
My process went something like this.
1- I would decide how many shelves I wanted to use and where I wanted to place them on the walls.
2- I would organize my 4-5 ft wood strips and drill holes about a half inch from the top of each one (hole should be wide enough to get a tie wrap through).
3- I would tie wrap the strips of wood to the top pipe (through the drilled holes). The strips of wood would now be hanging down from the top pipe/bar.
4- Once my wood strips were in place, I would place a sheet of foam board in front of the wood strips, essentially hiding them. For example, if I was starting to put up my foam board in this example on the left side of the back wall it would look like this.
5- Before you do anything else, it's time to attach a shelf! I would simply hold my shelf where I wanted to hang it, have a helper hold it, or have the helper reach around and hold the wood strips in place, and drill! (I liked to put my handy little level on the shelf before drilling, just to make sure that it was straight)...As I drill the screw through the shelf holes, they go right through the foam board and into the wood strips behind it. The wood strips ensure that everything is solid and tight and able to bare weight without the foam board tearing. In essence, the wood is carrying the burden of the weight and the foam board is simply sandwiched between the wood and the shelf. It's that easy!
Back to the perfect $3 shelf. Kind of too good to be true!...Yes, yes it was! Ikea does not make them anymore. (Waaaaa WAAAA, can you hear that disappointment music?...) I will post a bunch of close up photos of them however, when I am reunited with them in August at the show, if you know a carpenter or woodworker, you might be able to have some made, the construction is crazy easy.
If you want to use another type of small shelf, you can, and hanging them might sound like a process, but in actual fact, it is not that horrible to do, it just takes a little patience, some measuring and some organizing.
Here it goes.
Basically, what you are going to do, is sandwich your foam board between a strip of wood and a shelf,
that is how the shelf will stay up.
In the case of the STRIPPA shelves, there were simply 2 holes supplied, right in the shelves to hang them up.
A screw in each and presto, the shelf was up.
here's a closer shot of a single shelf, you can see where the screws go in on either side of the clipboards.
1- I would decide how many shelves I wanted to use and where I wanted to place them on the walls.
2- I would organize my 4-5 ft wood strips and drill holes about a half inch from the top of each one (hole should be wide enough to get a tie wrap through).
3- I would tie wrap the strips of wood to the top pipe (through the drilled holes). The strips of wood would now be hanging down from the top pipe/bar.
you can repeat this step as many times as you need, ie: if you want to put 3 shelves up on this back wall, you will need to tie up 6 wood strips, 2 per shelf. You can do the same for your side walls.
later that day...
but, here's what it will look like (without xray vision)
So, there you have it...the process I used to put up sturdy little shelves in an unstable little world!
I will be testing out lots of new ideas at the show this August however, as I am working with http://www.foamwerks.com/ testing out all their really cool products! I can't wait to share ideas, tips and tricks!
Wednesday, July 14, 2010
WALLS!!!
WALLS...WHAT DO YOU PUT ON THE BOOTH WALLS NADINE????
Definitely a common question these days...FOAM BOARD! is the simple answer.
What is foam board (aka foam core, foam core board)? it's this really cool stuff that is best explained by the experts, so I will refer you here. You can also look here, and here.
There are a gazillion options for your walls, and I have tried several different looks. I have used colored draping that I hung over the supplied walls or drapes using metal S hooks (lots of ironing involved, in my opinion they always looked a little too drapey and not quite sleek enough). I have used painted canvas that I equipped with silver grommets on the top edge for hanging, and again, although less drapey than drapes, still not easy to keep flat and smooth looking. So far, short of building custom walls out of wood, which I have never felt compelled to use (for a few very key reasons that I will mention below*) Foam board has been my best wall choice to date in terms of ease, expense and overall look.
*Wooden walls would be ideal for certain situations, using sheets of plywood or ie: super easy to paint, super easy to drill into (think shelves, hooks, anything really), however, for me, unless you live around the corner from where you will be exhibiting, or have a budget and can hire a carpenter/handyman/painter, delivery van and installer, well, you are likely not even reading this blog post, because you have an unlimited budget and all of the above staff on hand...if you do have the budget and staff on hand but are still here reading this blog post, first off, hi! and if you need a new booth concept and want to hire someone to do that part, call me now. (seriously).
So, back to foam board.
We use the large 4' x 8' sheets, so far, in white. You can buy black or white at most art stores or art supply companies and some offer custom colors or an array of colors that you can choose from. The price difference between the white and black and color is usually quite substantial, if you have the time during set up, Foam board can be painted using acrylic paint and a roller, so you could actually make it any color you want! Our supplier of choice, by far, is http://www.utrechtart.com/
I repeat! BY FAR! why? Not only do they deliver in a bunch of show cities, if they don't deliver, their customer service is so amazingly outstanding that once, in DC, they actually sent an employee with us to help us walk the many sheets of foam board to the convention center from their retail store (many blocks)...see why we love them? ...and guess what? that's not all, I have another amazing story to tell you about them a little later.
Factoid: Foam board is light and easy to move around and lift, 10 or 20 sheets together?, not so much, it gets heavy and rather awkward to maneuver.
Foam board will run you about $17 to $22 per sheet (4' x 8' sheet, or 48" x 96") the 2 thicknesses that you will usually find are 1/2" or 3/16th", we use the thinner 3/16th thickness and the prices here are for this thinner version. You can usually buy foam board in boxes of 25 sheets, you will see this online alot, but most places will sell it to you per/ sheet. http://www.utrechart.com/ will sell you the number of sheets you need, you do not need to buy a huge box. A great solution is also to call some other exhibitor friends and order together, this way you can share a box or a few boxes if necessary. Utrecht Art will deliver to the Javits Center usually for FREE, depending on which day you need it. For the gift fair, it's usually perfect for their Friday delivery and almost always arrives at around noon. We organize to have someone available to run out front and receive it- or a few people if the order is big. This door to door delivery in NYC is a trade show exhibitor's dream!!!! While we are ordering foam board, we usually order our flooring with Utrecht Art also, depending on what we are using, our last show, and this upcoming show, we used, and will be using a glossy mounting board for our flooring, it worked perfectly! More on the floor a little later...
Are you finding this information helpful? have I told you anything you didn't already know? are you looking forward to what's next? let me know, leave a comment.
Definitely a common question these days...FOAM BOARD! is the simple answer.
What is foam board (aka foam core, foam core board)? it's this really cool stuff that is best explained by the experts, so I will refer you here. You can also look here, and here.
*Wooden walls would be ideal for certain situations, using sheets of plywood or ie: super easy to paint, super easy to drill into (think shelves, hooks, anything really), however, for me, unless you live around the corner from where you will be exhibiting, or have a budget and can hire a carpenter/handyman/painter, delivery van and installer, well, you are likely not even reading this blog post, because you have an unlimited budget and all of the above staff on hand...if you do have the budget and staff on hand but are still here reading this blog post, first off, hi! and if you need a new booth concept and want to hire someone to do that part, call me now. (seriously).
So, back to foam board.
We use the large 4' x 8' sheets, so far, in white. You can buy black or white at most art stores or art supply companies and some offer custom colors or an array of colors that you can choose from. The price difference between the white and black and color is usually quite substantial, if you have the time during set up, Foam board can be painted using acrylic paint and a roller, so you could actually make it any color you want! Our supplier of choice, by far, is http://www.utrechtart.com/
I repeat! BY FAR! why? Not only do they deliver in a bunch of show cities, if they don't deliver, their customer service is so amazingly outstanding that once, in DC, they actually sent an employee with us to help us walk the many sheets of foam board to the convention center from their retail store (many blocks)...see why we love them? ...and guess what? that's not all, I have another amazing story to tell you about them a little later.
Factoid: Foam board is light and easy to move around and lift, 10 or 20 sheets together?, not so much, it gets heavy and rather awkward to maneuver.
Foam board will run you about $17 to $22 per sheet (4' x 8' sheet, or 48" x 96") the 2 thicknesses that you will usually find are 1/2" or 3/16th", we use the thinner 3/16th thickness and the prices here are for this thinner version. You can usually buy foam board in boxes of 25 sheets, you will see this online alot, but most places will sell it to you per/ sheet. http://www.utrechart.com/ will sell you the number of sheets you need, you do not need to buy a huge box. A great solution is also to call some other exhibitor friends and order together, this way you can share a box or a few boxes if necessary. Utrecht Art will deliver to the Javits Center usually for FREE, depending on which day you need it. For the gift fair, it's usually perfect for their Friday delivery and almost always arrives at around noon. We organize to have someone available to run out front and receive it- or a few people if the order is big. This door to door delivery in NYC is a trade show exhibitor's dream!!!! While we are ordering foam board, we usually order our flooring with Utrecht Art also, depending on what we are using, our last show, and this upcoming show, we used, and will be using a glossy mounting board for our flooring, it worked perfectly! More on the floor a little later...
Are you finding this information helpful? have I told you anything you didn't already know? are you looking forward to what's next? let me know, leave a comment.
Labels:
booth,
booth design,
convention center,
display,
foamboard,
Ikea shelves,
inexpensive,
Javits Center,
merchandising,
Utrecht,
walls
Saturday, March 20, 2010
anthropologie love...
I have a confession to make, I have a little bit of an obsession with Anthropologie.
Yes the clothes are pretty and I have found some amazing pieces there over the years, and yes, the catalog is also pretty and amazingly fun and inspiring to peruse...but holy mother of merchandising GODS...their displays, photography and styling is GENIUS! Would I like to work for the company? (which is Urban Outfitters actually) uh, YES!!!! (pick me, pick me!). Anyhow, I just got yet another gorgeous email from my personal friend "Anthro" and take a look at what they did this time- combining some of my very favorite things. Cardboard, doll houses, architecture, style and utter cuteness...I might need to go buy some cardboard and new blade and start building my very on dollhouse!
Labels:
anthropologie,
booth design,
display,
dollhouse,
hire me,
merchandising
Subscribe to:
Posts (Atom)